Here is a brief glimpse inside my head almost every night after my girl has gone to bed....
"blog or sew? blog or sew? sew or blog? blogorsew blogorsew blogorsew?"
Then I usually end up sitting on Facebook or Babycenter.
*sigh*
But tonight I am actually going to update!
I've been doing No Poo for about four weeks now and I absolutely LOVE it! It is so easy, and my hair feels sooo clean and soft. The detox period wasn't bad at all, I think mainly because I opted for the more drawn out detox. For the most part I washed every two days, I think once or twice I went 3. Tomorrow is a wash day and my hair right now feels barely greasy.
I am still sticking with the standard 1 tbsp per 1 cup of water for both the vinegar and baking soda. I did try to lessen the amount of baking soda once, but after my hair dried I found greasy patches. Less baking soda just doesn't work well for my hair I guess. For the vinegar rinse, I mix up 1 cup and put it in the squirt bottle, but only use about half each time, so 1 bottle lasts me two washes.
I am so glad I made the switch. If things keep going this well, maybe I'll never have to 'Poo again!
Wednesday, April 13, 2011
Sunday, April 3, 2011
Overalls/Shortalls Tutorial
UPDATED at the bottom to include pics of some boyish ones I made!
Let me preface this by saying that I don't really write tutorials, so I'm sorry if I things are as clear as they could be, or if do it "wrong". Hopefully this will at least help you in some way while making overalls for your kiddo and not just confuse you more. I also apologize for the quality of the pictures. It was night, and I was working on the living room floor.
I wanted to make my girl some overalls and was having a hard time finding a tutorial that fit what I wanted. I certainly didn't want to buy a pattern, so I figured I would just wing it (couldn't be too complicated, right? HA!) This is the product of several pairs of overalls with adjustments each time. I don't know exactly how much fabric it takes, but 1 yard was more than enough for me to make a pair for my 2 year old. As for sewing time, also can't really give a good estimate because my sewing takes place in between my child rearing. Start to finish, (including stopping to feed/wrangle/play with/putting a kiddo to bed) is about 4 hours.
First, you need a pair of pants that fits your kiddo. Fold em in half. Fold your fabric over, and place the pants on the fabric like so. Trace them adding your preferred seam allowance and cut. (Decide how long you want the legs to be, plus a little for hemming.)

Thank your "helper" for her assistance.

Now take the piece you just cut out, and use it as a template to cut a 2nd piece so you have 2 identical pieces. These will be the shorts part of the overalls.

Now for the bodice.

This is also on the fold of the fabric. It is about 6.5 inches tall, and 6.5 inches wide. The top line is 2.75 inches, and that bottom one off to the side is 1.5. These measurements fit my smallish 2 year old with room to grow. Here is what it should look like all cut out.

Next is the back bodice piece. This is very similar to the front bodice piece, just a little skinnier. The measurement at the top is 4 inches (so it would be two inches cut on the fold of the fabric) I thought I had a picture of it traced on the fabric, but I guess my kiddo deleted it while playing with my camera.

Heres a comparison of the front and back bodice pieces.

Now for the straps. There might be an easier way of doing this, but this is how I do it. I want my straps to be about 10 inches long, with a width of 2 inches tapering off to 1 inch. So I cut out a rectangle that measured 4x10.5 inches, then folded it in half lengthwise. At the top I use the ruler and mark at the .5 point and the 1.5 point. Then draw a diagonal from each point to the corner.

Then cut on those lines, leaving this. Repeat, so you have a total of 4 of these pieces.

Now we're gonna cut out the lining for the bodice. Take the front bodice piece and place it on your coordinating fabric.

Oblige the toddler saying "Take a picture of me mom, CHEESE!"

Then do the same thing with the back bodice piece, so you have 4 pieces. Two front, and two back.

For the waistband, put your two bodice pieces together at one end, and measure to give you the length you need. Mine was 26 inches. The width depends on how think you want the waistband. I like a skinnier one, so I made mine 3.5 inches.

This is what you should have so far....

4 bodice pieces, 4 strap pieces, 1 waistband piece, 2 short pieces. (ignore those two pink squares, they were going to be pockets, but then I went and forgot to add them.)
Now to start sewing. Take your two front bodice pieces and put them wrong sides together. Now we are going to sew around the top of it. Start at the black pin on the left, go up the curve, across the top, then down that curve, stopping at the other black pin.

Put two of the strap pieces right sides together, and sew them together, leaving the wide bottom open for turning. Repeat for the other two.
Turn the straps and the bodice right side out, and iron down.
Then take the waist strap and fold it in half width wise, so you have a long skinny strip. Iron.
Here is what we've got so far. ( I decided it needed an applique.)

Now take the two back bodice pieces and put them right sides together. Take the two straps, and put them between the two layers like this.

Make sure a little bit of the ends of the straps are sticking out to make sure they get caught in the stitching.

Now sew it like we did the front bodice, starting at the bottom of one curve, up the curve, across the top, and down the other curve. Turn right side out and iron.

Now we have our two bodice pieces and our waist band.

Put the two bodice pieces right sides together. Sew at one end. (I serged, you could zig zag, or whatever your preferred method is.)

Open it up, and put the waist strap (right sides together if your coordinating fabric is patterned) on top of the bottom of the bodice pieces, lining up the edges and sew them together. (Sorry, I apparently forgot to get a picture of this step.) Open them up and iron the seam. This is what you have so far. (Like my pretty Little Mermaid sheet? Its what I do my ironing on, because I detest ironing boards.)

Now for the pants part. Hem the bottom however you prefer. Then fold it in half like it was when you cut it. Now we are going to sew the seam that goes from the cuff of the leg up to the crotch.

Do the same to both leg pieces.

Now turn one leg right side out, and place it inside the other leg, lining up the seams.

Sew along that U shaped edge.

Turn them right side out and admire your handiwork.We're almost finished!

Back to the bodice, put them right sides together again, and sew up the other short edge, so its all connected.

Put the bodice over the shorts. The shorts should be right side out, the bodice wrong side out. You want the shorts inside the bodice. The shorts are sandwiched in the bodice. (So sorry if I'm not explaining this clearly, I'm trying!) Line up the edges, and sew all the way around.

Flip the bodice up. Iron. Topstitch if you so desire. Add your preferred closure (I like plastic snaps). Congrats, you're finished! Put em on your kiddo, and bask in the cute!

I would love to know if you sew any overalls with these, and would love to see pictures! If there are any questions I will try my best to answer them. Please link back and credit me if you blog about these at all, and please only use this tutorial for personal use. Have fun!
 [
[
Some boyish ones I sewed up!


Let me preface this by saying that I don't really write tutorials, so I'm sorry if I things are as clear as they could be, or if do it "wrong". Hopefully this will at least help you in some way while making overalls for your kiddo and not just confuse you more. I also apologize for the quality of the pictures. It was night, and I was working on the living room floor.
I wanted to make my girl some overalls and was having a hard time finding a tutorial that fit what I wanted. I certainly didn't want to buy a pattern, so I figured I would just wing it (couldn't be too complicated, right? HA!) This is the product of several pairs of overalls with adjustments each time. I don't know exactly how much fabric it takes, but 1 yard was more than enough for me to make a pair for my 2 year old. As for sewing time, also can't really give a good estimate because my sewing takes place in between my child rearing. Start to finish, (including stopping to feed/wrangle/play with/putting a kiddo to bed) is about 4 hours.
First, you need a pair of pants that fits your kiddo. Fold em in half. Fold your fabric over, and place the pants on the fabric like so. Trace them adding your preferred seam allowance and cut. (Decide how long you want the legs to be, plus a little for hemming.)
Thank your "helper" for her assistance.
Now take the piece you just cut out, and use it as a template to cut a 2nd piece so you have 2 identical pieces. These will be the shorts part of the overalls.
Now for the bodice.
This is also on the fold of the fabric. It is about 6.5 inches tall, and 6.5 inches wide. The top line is 2.75 inches, and that bottom one off to the side is 1.5. These measurements fit my smallish 2 year old with room to grow. Here is what it should look like all cut out.
Next is the back bodice piece. This is very similar to the front bodice piece, just a little skinnier. The measurement at the top is 4 inches (so it would be two inches cut on the fold of the fabric) I thought I had a picture of it traced on the fabric, but I guess my kiddo deleted it while playing with my camera.
Heres a comparison of the front and back bodice pieces.
Now for the straps. There might be an easier way of doing this, but this is how I do it. I want my straps to be about 10 inches long, with a width of 2 inches tapering off to 1 inch. So I cut out a rectangle that measured 4x10.5 inches, then folded it in half lengthwise. At the top I use the ruler and mark at the .5 point and the 1.5 point. Then draw a diagonal from each point to the corner.
Then cut on those lines, leaving this. Repeat, so you have a total of 4 of these pieces.
Now we're gonna cut out the lining for the bodice. Take the front bodice piece and place it on your coordinating fabric.
Oblige the toddler saying "Take a picture of me mom, CHEESE!"
Then do the same thing with the back bodice piece, so you have 4 pieces. Two front, and two back.
For the waistband, put your two bodice pieces together at one end, and measure to give you the length you need. Mine was 26 inches. The width depends on how think you want the waistband. I like a skinnier one, so I made mine 3.5 inches.
This is what you should have so far....
4 bodice pieces, 4 strap pieces, 1 waistband piece, 2 short pieces. (ignore those two pink squares, they were going to be pockets, but then I went and forgot to add them.)
Now to start sewing. Take your two front bodice pieces and put them wrong sides together. Now we are going to sew around the top of it. Start at the black pin on the left, go up the curve, across the top, then down that curve, stopping at the other black pin.
Put two of the strap pieces right sides together, and sew them together, leaving the wide bottom open for turning. Repeat for the other two.
Turn the straps and the bodice right side out, and iron down.
Then take the waist strap and fold it in half width wise, so you have a long skinny strip. Iron.
Here is what we've got so far. ( I decided it needed an applique.)
Now take the two back bodice pieces and put them right sides together. Take the two straps, and put them between the two layers like this.
Make sure a little bit of the ends of the straps are sticking out to make sure they get caught in the stitching.
Now sew it like we did the front bodice, starting at the bottom of one curve, up the curve, across the top, and down the other curve. Turn right side out and iron.
Now we have our two bodice pieces and our waist band.
Put the two bodice pieces right sides together. Sew at one end. (I serged, you could zig zag, or whatever your preferred method is.)
Open it up, and put the waist strap (right sides together if your coordinating fabric is patterned) on top of the bottom of the bodice pieces, lining up the edges and sew them together. (Sorry, I apparently forgot to get a picture of this step.) Open them up and iron the seam. This is what you have so far. (Like my pretty Little Mermaid sheet? Its what I do my ironing on, because I detest ironing boards.)
Now for the pants part. Hem the bottom however you prefer. Then fold it in half like it was when you cut it. Now we are going to sew the seam that goes from the cuff of the leg up to the crotch.
Do the same to both leg pieces.
Now turn one leg right side out, and place it inside the other leg, lining up the seams.
Sew along that U shaped edge.
Turn them right side out and admire your handiwork.We're almost finished!
Back to the bodice, put them right sides together again, and sew up the other short edge, so its all connected.
Put the bodice over the shorts. The shorts should be right side out, the bodice wrong side out. You want the shorts inside the bodice. The shorts are sandwiched in the bodice. (So sorry if I'm not explaining this clearly, I'm trying!) Line up the edges, and sew all the way around.
Flip the bodice up. Iron. Topstitch if you so desire. Add your preferred closure (I like plastic snaps). Congrats, you're finished! Put em on your kiddo, and bask in the cute!
I would love to know if you sew any overalls with these, and would love to see pictures! If there are any questions I will try my best to answer them. Please link back and credit me if you blog about these at all, and please only use this tutorial for personal use. Have fun!
[Some boyish ones I sewed up!
Posted by
Paige
comments (3)
 Labels:
clothes
,
homemade
,
How to
,
how to sew overalls
,
how to sew shortalls
,
overalls tutorial
,
sewing
,
shortalls tutorial
Labels:
clothes
,
homemade
,
How to
,
how to sew overalls
,
how to sew shortalls
,
overalls tutorial
,
sewing
,
shortalls tutorial

Saturday, March 26, 2011
Interesting
I was looking for a video to share with a friend about Dr. Harvey Karp and the 5 S's, and one of the related videos was Dr. Karp's opinion about "hot saucing" as a punishment for children. In the video he says society doesn't find inflicting pain acceptable to do to spouses, etc, or even for convicted felons, so why is acceptable to do so to children?
Just something interesting I thought I would share.
Just something interesting I thought I would share.
Posted by
Paige
comments (0)
Tuesday, March 22, 2011
No More 'Poo!
No, I'm not sayin my girl has potty trained, because she hasn't, and if she had, I would be sad to say goodbye to all the Fluff. I'm talking about shampoo. I've been wanting to blog about this for a couple days, but time just keeps getting away from me.
I've read about the method thats called "no 'poo" or, shampoo-free numerous times online, but never really gave it much thought. What is it? Its exactly as it sounds, well maybe not exactly, but its not using shampoo. Instead of using store bought shampoo and conditioner you use baking soda and vinegar. Essentially what you do is "shampoo" your hair with baking soda, and "condition" it with vinegar. The most common starting off point is 1 tablespoon baking soda in 1 cup of water, and 1 tablespoon of vinegar in 1 cup of water. These amounts might change once you figure out what works best for your though (more baking soda/less vinegar if you have naturally oily hair, less baking soda/more vinegar if you have naturally dry hair).
Why would you want to ditch shampoo? There are a couple reasons.
Your scalp produces oil naturally because its good for your hair. The checmicals in the shampoo strips all those good natural oils away, and then your scalp goes into overdrive to produce more oils. So you shampoo again because your hair is all oily. Its a vicious cycle.
There are all sorts of chemicals in shampoo and conditioner, chemicals you might not necessarily want on your scalp and skin.
Shampoo and conditioner are expensive! (especially if you have long hair)
There is a wealth of information out there, written by people who know more about all the intricate details of this than I do, so I'm not going to go into it any deeper than that brief summary.
Like I said, I've "heard" about it a couple times online, mainly on the Crunchy Mamas board on my parenting community. I hadn't given it much thought before, but lately my hair has been driving me crazy. No matter what I did or what shampoo/conditioner I used, or how much (how little) I used, my hair felt gross and weighed-down the day after I showered, sometimes even the same day I showered. So I read about it some more then decided to give it a shot. Its not like I had anything to lose.
I did my first No 'Poo wash on Friday. I just grabbed two mugs from the kitchen and put 1 tablespoon baking soda in one, and 1 tablespoon apple-cider vinegar in the other and then a cup of warm water in each, and stirred the baking soda a little bit. Then took em to the bathroom. I pretty much just dumped the baking soda mixture on my head, tilting my head back and using one hand as a visor to keep it out of my eyes. Then rubbed it all over my hair, making sure to be thorough and not miss any spots. I let it sit for a little bit, then rinsed it out, making sure it was completely rinsed out. Next came the mug with the vinegar mixture. Same as before, poured it over my head making sure not to get it in my eyes, let it sit for a little, then rinse thoroughly.
I was extra thorough with rubbing it all in and rinsing it all out because I had read on other mamas blogs that not doing so could result in problems. I was also worried about the vinegar smell. From what I read the only reason you would still smell the vinegar once your hair was dry was if you used too much or didn't rinse it all out. I was paranoid, especially because the vinegar smelled so strong when I poured it on. After I was done rinsing though I couldn't smell it all, even though my hair was still wet. I was relieved.
It felt a little coarse at first, and I had little frizzies (which I had always had before.) Once my hair was dry though it felt WONDERFUL. It was soft and silky, smooth. No frizzies, no greasy/oily/weighed down feeling. I loved it. My hair actually felt clean for the first time in awhile. It was doing pretty good the next day too, didn't feel or look nearly as greasy as it did on the days after I used shampoo. The day after, I was feeling kinda grungy though, and my hair definitely looked oily. It was to be expected though, there is a transition period after you quit/reduce shampoo where your scalp is still overproducing oil before it adjusts to the new lower demand. You can either have a longer less noticeable detox by gradually spacing out washes (every day, every other day, etc) or you can get it done all at once. I read of one woman who waited 13 days before she did another wash, some go a week. I went two days. First wash on friday, nothing on saturday or sunday, and did washed again monday morning. I don't think I could handle going longer than that at this point, just waiting the two days was pushing it for me. Once the transition is over though, it should be fine. There were a couple pictures people had posted of their hair on the third day without a wash and it looked like they had washed it that very day.
The results today were the same as the first day, my hair was ridiculous silky and smooth, I just kept wanting to run my fingers through it and play with it. I went out today and bought little squeeze bottles to use, instead of mugs, so hopefully that will help with application. Not that using the mugs was difficult, just a pain to carry two mugs and a measuring cup upstairs to the bathroom with me, not to mention the worry of them being glass.
So final conclusion after two no 'poo washes is that I love it. We'll see how it goes and I'll try to remember to update about it. Next experiment is The Oil Cleansing Method. I bought the oils today, I'll let you know how it goes!
I've read about the method thats called "no 'poo" or, shampoo-free numerous times online, but never really gave it much thought. What is it? Its exactly as it sounds, well maybe not exactly, but its not using shampoo. Instead of using store bought shampoo and conditioner you use baking soda and vinegar. Essentially what you do is "shampoo" your hair with baking soda, and "condition" it with vinegar. The most common starting off point is 1 tablespoon baking soda in 1 cup of water, and 1 tablespoon of vinegar in 1 cup of water. These amounts might change once you figure out what works best for your though (more baking soda/less vinegar if you have naturally oily hair, less baking soda/more vinegar if you have naturally dry hair).
Why would you want to ditch shampoo? There are a couple reasons.
Your scalp produces oil naturally because its good for your hair. The checmicals in the shampoo strips all those good natural oils away, and then your scalp goes into overdrive to produce more oils. So you shampoo again because your hair is all oily. Its a vicious cycle.
There are all sorts of chemicals in shampoo and conditioner, chemicals you might not necessarily want on your scalp and skin.
Shampoo and conditioner are expensive! (especially if you have long hair)
There is a wealth of information out there, written by people who know more about all the intricate details of this than I do, so I'm not going to go into it any deeper than that brief summary.
Like I said, I've "heard" about it a couple times online, mainly on the Crunchy Mamas board on my parenting community. I hadn't given it much thought before, but lately my hair has been driving me crazy. No matter what I did or what shampoo/conditioner I used, or how much (how little) I used, my hair felt gross and weighed-down the day after I showered, sometimes even the same day I showered. So I read about it some more then decided to give it a shot. Its not like I had anything to lose.
I did my first No 'Poo wash on Friday. I just grabbed two mugs from the kitchen and put 1 tablespoon baking soda in one, and 1 tablespoon apple-cider vinegar in the other and then a cup of warm water in each, and stirred the baking soda a little bit. Then took em to the bathroom. I pretty much just dumped the baking soda mixture on my head, tilting my head back and using one hand as a visor to keep it out of my eyes. Then rubbed it all over my hair, making sure to be thorough and not miss any spots. I let it sit for a little bit, then rinsed it out, making sure it was completely rinsed out. Next came the mug with the vinegar mixture. Same as before, poured it over my head making sure not to get it in my eyes, let it sit for a little, then rinse thoroughly.
I was extra thorough with rubbing it all in and rinsing it all out because I had read on other mamas blogs that not doing so could result in problems. I was also worried about the vinegar smell. From what I read the only reason you would still smell the vinegar once your hair was dry was if you used too much or didn't rinse it all out. I was paranoid, especially because the vinegar smelled so strong when I poured it on. After I was done rinsing though I couldn't smell it all, even though my hair was still wet. I was relieved.
It felt a little coarse at first, and I had little frizzies (which I had always had before.) Once my hair was dry though it felt WONDERFUL. It was soft and silky, smooth. No frizzies, no greasy/oily/weighed down feeling. I loved it. My hair actually felt clean for the first time in awhile. It was doing pretty good the next day too, didn't feel or look nearly as greasy as it did on the days after I used shampoo. The day after, I was feeling kinda grungy though, and my hair definitely looked oily. It was to be expected though, there is a transition period after you quit/reduce shampoo where your scalp is still overproducing oil before it adjusts to the new lower demand. You can either have a longer less noticeable detox by gradually spacing out washes (every day, every other day, etc) or you can get it done all at once. I read of one woman who waited 13 days before she did another wash, some go a week. I went two days. First wash on friday, nothing on saturday or sunday, and did washed again monday morning. I don't think I could handle going longer than that at this point, just waiting the two days was pushing it for me. Once the transition is over though, it should be fine. There were a couple pictures people had posted of their hair on the third day without a wash and it looked like they had washed it that very day.
The results today were the same as the first day, my hair was ridiculous silky and smooth, I just kept wanting to run my fingers through it and play with it. I went out today and bought little squeeze bottles to use, instead of mugs, so hopefully that will help with application. Not that using the mugs was difficult, just a pain to carry two mugs and a measuring cup upstairs to the bathroom with me, not to mention the worry of them being glass.
So final conclusion after two no 'poo washes is that I love it. We'll see how it goes and I'll try to remember to update about it. Next experiment is The Oil Cleansing Method. I bought the oils today, I'll let you know how it goes!
Posted by
Paige
comments (2)
Thursday, March 3, 2011
Whew
The kiddo is sick and it sure is taking its toll. I haven't sewn in a week, keep forgetting to take pictures for 365, and am waking up multiple times a night to check her fever. Shes been battling the fever for about a week now, and if I don't give her medicine right on time then it spikes up to 104. I'm ready for my girl to feel better. :( But, as soon as she gets the medicine the fever is gone and shes wreaking havoc everywhere.
Anyways, just thought I should pop in and give an update real quick. I just uploaded the most recent 365 pictures as well. So far out of the 62 days we've had of 2011, I've got a picture for 52 of em, not too bad. http://www.flickr.com/photos/mercysmom/sets/72157625724706620/
Well my kid just dumped water all over herself so I better go. *sigh*
Anyways, just thought I should pop in and give an update real quick. I just uploaded the most recent 365 pictures as well. So far out of the 62 days we've had of 2011, I've got a picture for 52 of em, not too bad. http://www.flickr.com/photos/mercysmom/sets/72157625724706620/
Well my kid just dumped water all over herself so I better go. *sigh*
Posted by
Paige
comments (1)
Monday, February 14, 2011
My baby is TWO!

Yesterday was Mercedes' 2nd Birthday! It was a great day, we had a fantastic dinner at home with friends and family, then did cake and presents. She had a blast!
Its hard to believe she is already two. She went from this....

to this....

Shes gone from a lump of cute to an actual person. She is so smart, I can't believe how big her vocabulary is and how she talks and comprehends. and cute as all get-out. We have now been breastfeeding for two years, and are still rear-facing, two milestones I was excited and proud to have met. She loves to read and build with legos and blocks. She likes to sing the alphabet song and itsy bitsy spider and loves to count. Her favorite restaurant is Chipotle. She likes to watch Caillou and Dora the Explorer. She LOVES to color. She likes ice cream more than cake. She's amazing.
Posted by
Paige
comments (0)
Friday, February 11, 2011
Sew-A-Long Week 2!
This weeks sew-a-long craft was something Valentine's Day related, or a pair of pajamas. This worked out pretty well for me because I needed to sew up a VDay dress for my friends little girl anyways. This dress is the same as the one I made for my girl, they are gonna match!


Posted by
Paige
comments (1)
Monday, February 7, 2011
Refashioned shirts
A few days ago I posted this picture....
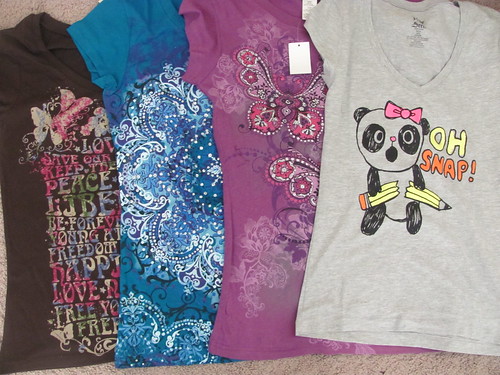
Four shirts I picked up on clearance at Walmart for three bucks each. Total of $12 dollars. Here is the after shot-

Kiddo shirts at wallys and target are usually $4-$6. By purchasing the adolescent shirts on clearance and then refashioning them I was able to get four shirts and a skirt for the same price as two or three tops. The neckline on the butterfly shirt stretched out when I was sewing it so it looks kinda wonky in the picture, but I am going to see if adding snaps in the back will fix that. Even if it doesn't though, I still got a super cute skirt out of that shirt!
Four shirts I picked up on clearance at Walmart for three bucks each. Total of $12 dollars. Here is the after shot-
Kiddo shirts at wallys and target are usually $4-$6. By purchasing the adolescent shirts on clearance and then refashioning them I was able to get four shirts and a skirt for the same price as two or three tops. The neckline on the butterfly shirt stretched out when I was sewing it so it looks kinda wonky in the picture, but I am going to see if adding snaps in the back will fix that. Even if it doesn't though, I still got a super cute skirt out of that shirt!
Posted by
Paige
comments (2)
Saturday, February 5, 2011
365 update, 1 month down!
We're now into month two of the 365 project (well, actually that was a couple days ago but I'm just now getting around to posting). The first month was a ton of fun and I think I did pretty well with only missing one day, I hope February goes as well too!
Posted by
Paige
comments (0)
Tuesday, February 1, 2011
Crafty Sewin Mamas Sewalong

An online sewing board I'm a part of has decided to do a sewalong/blogathon. Several ladies were lacking the motivation to sew much, and also post on their blog frequently so they decided to do a sew-along and invited anybody in the group that wanted to join to participate. Sounds like fun to me! They decided they would give two project choices and each person could pick which one they wanted to do (or both.) This week the options were a crochet hook holder, or a sewing machine cover. I haven't crocheted in a really long time and don't even know where any of my hooks have disappeared off to. And a sewing machine cover doesn't appeal to me in the least bit. (I'm on and off my machine too frequently to want to bother with putting on and removing a cover each time.)
However, my daughter does love to color. And we have a big ole 64 pack of crayolas, plus a ziploc baggie of crayons that lost their box. I'm a little OCD. I don't like crayons not having a place to live and the ziploc isn't really cutting it for me. Plus, the 64 pack box has gotten kinda beaten up with the flaps starting to fall apart, and I don't like that either. So I decided to do a variation on the crochet hook roll and do a crayon roll instead.
I've been putting off this project for awhile, I've seen it on numerous blogs before but for some reason it never really appealed to me. (Probably because Mercedes had not yet discovered her love of coloring and mangling the crayon boxes.) I sure was missing out though. This is definitely a fun project. Picking out the fabrics is fun, and its finally giving me a use for all these fat quarters I picked up on sale forever ago.
Like I said, instructions for these can be found all across the blogworld. I mainly followed the one over at Prudent Baby. The instructions said 18" by 6" but I cut my rectangles 17" by 6", made more sense to me. (1 inch for each crayon, then a .5 inch seam allowance on each side.) Then I just sewed it up following the directions. The first one I made I didn't include interfacing or anything at all, its just the regular quilters cotton. The second one I made I used a layer of antipill fleece (because I'm a lamer and don't have either interfacing or quilt batting on hand) in the middle. Both work great, but I think I prefer the one with the layer of antipill fleece. It just gives it a little bit more substance. The one without is nice and trim though and would fit in a smaller or already stuffed diaper bag better.
They sew up quickly and are so pretty when they are all finished! I <3 them so much, I think pretty much everybody I know can expect these as their present from me for any holiday for the rest of their lives.
They sew up quickly and are so pretty when they are all finished! I <3 them so much, I think pretty much everybody I know can expect these as their present from me for any holiday for the rest of their lives.

Posted by
Paige
comments (2)
Subscribe to:
Posts (Atom)

